Friday 20 July 2012

More Ply- Split Braiding.

Ply-Split Braided Linen Belt.

Made with my own hand made Linen cords, total length1075mm including buckle, width 42mm.
The buckle is a stainless steel roller buckle.

The braid is a 24 strand, 4 section SCOT (single course oblique twining) braid, a 5 strand POT (plain oblique twining) keeper loop, and the end of the belt is finished with a 2 section SCOT braid.

A perfect fit! also shown with one of my conquistadors braid belt loop watch straps, I hate wearing a watch on my wrist.

Close up showing the buckle detail, the POT (plain oblique twining) keeper loop which is spliced in to the belt itself, and the tip of the belt, of which the ends are all spliced back into the belt braid.

The belt can be pierced at any point along its length by pushing the prong through the braid. When you decide to change the length the old hole will close up with a simple wiggle of the braid.

Showing the very neat edge of the braid created by the Ply-Splitting process.


Ply-Split Braided bag strap.

Made with my own hand made Axminster wool cords, total length 1480mm, width 62mm.
The braid is a 24 strand, 4 section SCOT (single course oblique twining) braid
 The ends are spliced back into the braid and the starting rod was replaced by a cable laid cord with the ends finished in Manrope knots.
The bag that this strap is intended for is still on the drawing board! ;-?


Showing the very neat edge of the braid created by the Ply-Splitting process.

You can see more of my Ply Split work here:
Thanks for looking.
Take care,
Barry ;-)

Thursday 10 May 2012

Siva


How Do All ;-)

As mentioned in my last post, I said I was working on a new deck to go with the Siva Carbon Deck Brackets, well after much rushing and panicking to get the first prototype deck made before I went off to Germany, I just about managed by the skin of my teeth to get it off the mould cut and drilled with just hours to spare for the flight!

I did not take a spare deck with me and the Siva was completely untested, so if it turned out to be a bag of crap I would have been up Shit Creek without a paddle, though saying that the deck might have made a good paddle if nothing else ;-)  

Initial bounce tests show it has some flex so not a solid plank, but needed to be ridden to see if it worked out right.

I set it up with a PSD Barrier footstop mounted via my Kick 2 Switch method so I can ride it Goofy or Regular without messing about.


I put the Siva board to the test in Kettwig, Germany last week, and I am completely rocking this set up, the complete weight of the set up including Grip, Trucks and the like is 2948 grams, which is a great saving over my original Om set up which came in at 3802 grams, as a comparison, my Walkabout set up weighs in at 3828 grams.


The Siva comprises of a multi layer foam core, laminated with wood reinforcements and carbon skins, the brackets are a solid composite of uni carbon, woven carbon and triaxial glass fiber, I could have used a foam or other materials as a core in the brackets to make them even lighter but this would have made the moulding more difficult so a few layers of triaxial glass interspersed between the carbon gives a little extra thickness at the cost of a little extra weight, (only a few grams in reality) 
My goal was not to make a super feather weight board, but a stiffer and slightly lighter board than my Om.  


The deck has a little camber about 3mm and a really nice comfortable concave at about 8mm across the widest part of the deck.
The deck is just a tad over 10 inches wide as I wanted as much foot contact with the deck as possible and made the rear of the deck the same width to give the same area for the rear foot instead of narrowing the deck towards the rear as seems to be the norm.
There is just a little flex in the deck as I wanted the ride to feel very direct without the truck angles changing too much in deep hard pumps, as I found this to be a problem on the Om set up, maybe a little more flex would be preferable for some people, and I will make another deck as a comparison later.


I kept the 840mm wheel centre to wheel centre length the same as my Walkabout and Om set ups as this really suits me and my truck set up.

The deck is set up with a 5.0 Vector front at about +20 degrees with pink Reflex bushings and the rear is a 130mm seismic stable, with Red/Light springs at about -7   degrees.
77mm Seismic speedvents and Tekton bearings.

I bought a roll of grip tape at the Subvert skate store in Hamburg and just applied it simply to the whole deck with only a cut out for the BB deck top logo which I think looks pretty neat   and was much less work than trying to cut some fancy design it, I think I learnt my lesson after cutting the Namaste name in the grip on Victoria's board.


I tested the board over several days along a 10.8 km section of the River Ruhr between Kettwig and Mülheim, The pavement is immaculate on the whole, only getting a little rough near Mülheim and the closest thing to skate Nirvana I have ever had the pleasure to play on!


The first day I went out I skated just over 8km before the heavens opened and I was forced to take shelter before until the rain stopped just long enough to get to a bus stop on the main road near Mülheim I then had to sit for 25 minutes through an onslaught of forked lightning, thunder and heavy rain  

the following day the weather was fantastic and I was able to skate to Mülheim and back twice over, making up nearly 40km before tea time.

Siva Performed fantastically, with a very direct, solid and stable feel it was a joy to ride and I could have skated to Mülheim and back again given more time ;-)

The Kick 2 Switch footstop  mounting works like a dream also and switching from Goofy to Regular is no hassle as the footstop will move to whatever angle your foot needs it at, so is very comfortable and easy to use.

I was also able to try out my adjustable carry sling making it easy to carry the board around town hands free after a Stoke Fest of a day!


I Also got to skate with my girlfriend Victoria, which was really cool as there is nothing like skating with good company.


We skated along the Ruhr and I was able to try out her Namaste, now set up with a pair of the Siva Carbon deck brackets also, and this rides really great also and nice to try the brackets with an RTS rear truck as a comparison to the Seismic stable on my board, the RTS has a much more carvy and fun feel at the same angle compared to the more direct less carvy feel of the Seismic. so I am thinking of using an RTS again on my Om as a fun town board.


Take care,
Barry ;-)


Monday 10 October 2011

Playing With UV Again!

The last time I experimented with UV Black Lights was during the making of my Fluo Ditty Bag, this bag had lots of fluorescent Yellow UV reactive cord used to make a very happy bright bag; as you can see below.


Above and below: Under Natural light and also under UV Black Light.


After making this bag I did not get around to playing with UV again until now; when a friend asked me to make some pineapple knots for him. one of these was to be bright, and as you can see below, under UV light it fills that requirement quite handsomely.
This is a 40p x 36b, 6 pass, Type 5 Pineapple Knot.


                    Below: under normal lights.                
    

And from the top under UV again.


Playing with UV Black Light is fun but only in very small doses; and with protective glasses, even then I still got a headache taking the pictures.

Take care,
Barry ;-)


Saturday 8 October 2011

Two B, or Knot Two B!

Two B, or Knot Two B!
Is that a question; or a statement, and does anyone really care?


Well I care, and have spent the past two years or more nursing an idea that I was not able to properly bring to life.
The Two B's in question are my Initials, and the Knot in question is a 3 part x 4 bight Casa Knot (simple over one under  pattern Turk's-Head) also known as a Carrick mat in its flat form.

My idea was to create a logo for myself using my initials, and some how linking them in such a way to create an interlinked knot like structure. I tried as many ways of linking two B's together as where physically possible, but the B's would not have it in their original form.
Then one day it hit me whilst playing around with a Carrick mat; that I could use the same single strand form of this knot to create Two perfectly joined, symmetrical B shapes, all that was needed to really make the B's stand out was 2 different colours.

I drew the logo out many times on paper until I was happy with the shape and then scanned it into the computer thinking I would quickly be able to make a perfect  logo graphic from my drawings, I bust my ass trying to get the expensive drawing program do what I wanted, but due to my lack of computer savvy; and short temper I gave up and the logo sat in my To Do pile for the duration.

A stroke of luck and a common shared interest in LDP (Long Distance Pumping) (skateboarding long distances without pushing; for those still scratching their heads)  enter Tim Pritchard of Pritchard Skate Designs (PSD).
After having a Rad day tearing up the pavement at Dorney Rowing Lake with Tim; and learning of his skills with CAD and the like, a few emails followed and Tim kindly took my basic scanned drawings and was able to draw up my design in Cad and tweak it till perfect. He then saved the drawings as Photo Shop files; with which I could play with the layers, colors and effects till my heart was content, and what you see above is the sum of that two years faffing brought to life in less than a two weeks!

So; a Big Thank You to Tim for helping be bring my idea to life, it would have still been on the To Do pile till Worlds end otherwise.
Also a Big Thank You to my friend Clive S. for helping me out with, and getting me properly sorted with Photo Shop, Skype Screen Sharing is a tool worth more than a thousand words ;-)

So where now?
I am now completely happy with the design and the only thing that I might change is the lettering style of my name in the right B, I will also be using the BB logo without my name in the right B for all my off line activities, and may change the colour of the right B to suit certain projects.

I have now updated my main web site incorporating the Logo on the front page, and changing the colours scheme of the site to match.


I hope you all like.

Take care,
Barry ;-)


Saturday 20 August 2011

Bags, Bugs & Bikes.

Been a Busy "B" Lately.
Bags
A Draw Corded Ditty Bag.
I was asked if I could create a standard sized bag with a hemp draw cord by some folks in Canada, and yes; I know I said I was not going to do this type of work again, but as I happened to have a couple of unfinished bag bodies, and also because I find it hard to say No! I got to work, and below is what I came up with from my brief.
The folks from Canada never got back to me; but luckily the bag has now been sold to another more deserving person :-)
 
Hand seamed in 12oz Cotton Duck canvas, with 6 hand sewn grommet eyelets. 

Threaded with a Hemp draw cord, the ends joined with a doubled Bosun's Lanyard knot, and finished with a seizing in waxed Hemp twine.

The sliding closure; or puckering knot is a single strand Mathew Walker knot, made with my own hand laid Hemp twine; and sized with a natural sealer. 

Some of the tools of the my trade.

Puckered up and ready to go.


Bugs.

In between jobs I decided to do a little R&R in the garden; and whilst minding my own business a little Grass Hopper hopped over for a chat, before gettign down to the business of making little Grass Hopper's with his mate; whom was keeping an eye on her mate from the adjasent Rose.


& Bikes.
And on to the business of serious fun making!
I have been fetteling with my race / road training bike over the past few weeks, I still have a way's to go yet but this is what I have done so far.

I concentrated mainly on the rear wheel and wheel disks, the original Carbon fibre moulded disks I made; and had great success with; actually winning races in my class ;-) have now been passed on and I set about building a whole new rear wheel, the main reason for a new wheel was to trim a little weight off, quieten th e thundering noise I got every time I hit a bumb; and that the original rim did not have enough surface area for attaching the fabric covering.

The covering is is a very light weight ripstop nylon which is stretched and bonded to the rim before being sealed with cellulose.

here on the non drive side you can see the foil tape patch that gives access to the valve stem for pumping the tyre, the patch make the wheel more aerodynamic than if it was left with the gaping hole in it.

I then got down to the business of comfort and made a new air mesh padded seat pad, and pillow neck rest from the same materials, and I can confirm that it is too comfortable, I have been spotted napping on several occasions whilst out and presumably training ;-)
I could not help myself and had to add a nice dimpled look to the pad very cushy.

I still have the new bars I made to fit, which include a whole new brake and gear operating system, some serious chopping and modding going on there.
more to follow soon?

Take care,
Barry ;-) 

Monday 4 July 2011

Bag To The Future!

How Do All ;-)

A bit of a departure from the expected Rope & Canvas; but no less interesting, for me in any case.
I started racing my Laid Back (Recumbent Cylce) in 2010 with the British Human Power Club, but as I have no other transport; I had to rely on outside help to get my bag of bits to the race track, later in the year I purchased a single wheel trailer which made it easier for me to get to my local circuit with all of the unnecessary crap I thought I needed to take.
Problem with the trailer is that to travel further a field would mean travelling with the bike and trailer on public transport, not an easy task getting on and off trains or navigating stairs with both items.

After seeing a set of saddle bags that fellow racer Dave T had slung over his seat and hearing that he travelled all over the country to races by train not to mention the fact he lives in the arse end of the county; down Cornwall way, talk about commitment (Hero)  ;-)
Here is a picture of Dave's bike and saddle bags; taken by me at Reading last month.

Any how I decided this year I wanted to get to more races and a set of bags like that would be just the ticket.
I first started out travelling to a race in Reading slinging a pair of Ortlieb canoe bags on either side of the seat which worked handsomely; but lacked the convenience of proper securing straps or zips to get at my stuff whilst attached to the bike still.
After making a couple of prototype designs using ideas from the afore mentioned Hero racer's bags and also details kindly given by another fellow racer Barney H; I decided the shape these guys were using did not suit my set up and the bags seem to slump under my seat, where as the cylinder shaped canoe bags seemed to sit nicely and make good arm rests too, just like a rolling armchair ;-)
Well this is where I am at now; with a  nice set of bright Orange, Polyester reinforced PVC saddle bags.
I can just sling these over my seat and ride. there is no need to have a rack mounted as the bags are supported by the seat, and the bags are joined three webbing straps.
When I get to the train station I just whip the bags off and throw them over my shoulder using one of the end straps as a shoulder strap. 

There are 3 side compression straps, so should I wish to I can carry extra items, like a full sized track pump or whatever. I have that option, the centre strap has a side release buckle for easier access to the main zip opening.

The bags sit fairly high up on the seat and close to the body so don't affect the ride of the bike or create to much drag, definitely and improvement from the energy sapping trailer with pannier bags on it.

I did think that bags like this would just swing about wildly from side to side under the seat when cornering, but they are completely stable with no noticeable movement. now all I need to add is a cup holder  ;-)


The ends on the bag bodies are hand seamed as this is easier to do by hand than machine, and gives a better and stronger finish, in my opinion anyway,

The volume of each bag is exactly 14.034 litres  making for a handy 28 litres total carrying space, same size as the average day pack.

I took some of the design inspiration from my North Face, Base Camp Duffel's, of which I have several; now battle scarred, but still going strong, a testament to their reliability and build quality, lets see if my bags last as long ;-)
Maybe at some point I will add a detachable shoulder strap, or dedicated grab handles,

Take care,
Barry ;-)

Tuesday 3 May 2011

Net Making Tools (p2)

Here is another selection of tools I use for net making, Including Netting Needles, a Needle Winder and a Netting Stand Click on the pictures to see them full size.

Netting Needles or Shuttles.
OK, I admit it; I have a Netting Needle fetish ;-)
Here is a selction of the needles I have in my collection, all are manufactured from various plastics. Sorry to all the wood purists out there that like to make their own; maybe next time I will have some wood needles to show.
By the way if you have never made a wood needle for yourself, I can highly recommend doing it, you will learn a lot by making your own; and there is nothing quite like making an piece of netting with the tools  that you have also made.

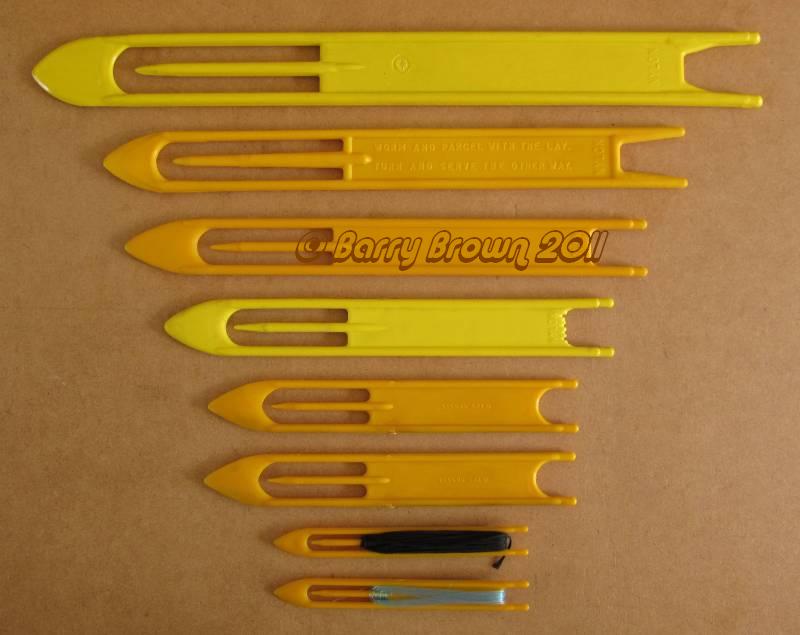
Here are some injection moulded Nylon needles, in 6, 10,  12, 14, 16 and 20 inch lengths.

 A well known passage molded on one of the needles pictured above, though what the words have to do with net making is beyond me, obviously designed by a knot tyer that could not think of something netting related to have molded into the needle ;-) I like it non the less though.

Norwegian Netting Needles, from Norway just incase you were wondering.
These are my favorite needles, made from Acetal, an engineering plastic; which is very strong and hard wearing, I have many sizes of these varying from 6.5mm wide x 100mm long, up to 32mm wide x 310mm long. the largest of which I use for my Hammocks and normally have 30 of them filled and ready for action to make each hammock body.
I do keep a large stock of these needles for sale; but they are not cheap.

 Toka Needles, in 8, 10, 12, 14 and 27 mm widths and vary from 5.5 - 9.5 inches long, I don't bother with these much; though the smallest size is great for making small mesh netted items.

Some more molded Nylon needles, I don't like these much as they have a short body section so don't hold very much twine, these needles are in 5, 6, 7, 8 and 10 inch lengths.

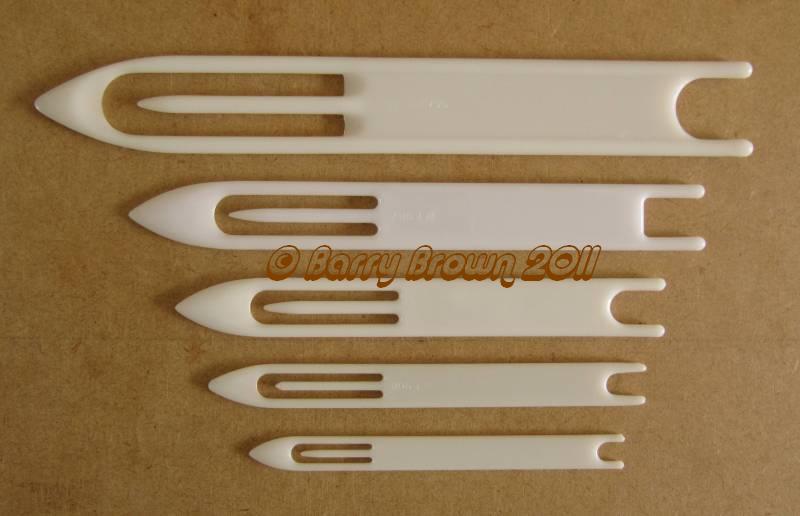
 Glass reinforced Nylon? needles from Loomis, U.S.A. same pattern as the Norwegian needles but in my opinion they are not nearly as nicely made.

Some basic plastic needles in 6, 8 and 10 inch lengths, the plastic is a little more flexible than Nylon but the design of these needle is very well thought out; having a long tongue which touches the top of the opening; they will not spill twine when dropped, and they also hold a fair amount of twine, and I prefer these to the Nylon types.
I use these needles for workshops and teaching, and also keep a fair stock of them for sale.

Some small Nylon needles which I bought at a knot tying meeting; I only bought them because I could not find anything else I wanted; and hated having to go away empty handed.
These are 6" long and the body is slimmed down allowing a larger amount of twine to be wound on the needle without bulking out too much.

These plated steel needles are used for very fine decorative and Guipure netting, these particular needles are cheaply made and tend to have burs or plating defects which can catch on the twine being used, you can buy good reproduction brass copies of this type of needle but they are fairly pricey, I am not really into doing this type of netting, but the finished articles can be very beautiful indeed.

You can never have too many needles, OK so maybe I have a few more than I really need, but when making any piece of netting; I may have up to 25 or 30 needles filled and ready to use, there is nothing I hate more than having a needle run out of twine when I am going at full steam, and having to start winding another needle full of twine, better to have enough wound up before starting on your project.

 Needle or Shuttle Winder.

My; now not so Top Secret Weapon! and before anyone asks, I can not make you one; sorry, I no longer have access to the tools and materials to do this sort of work now.

The device will only work with Norwegian style needles that have a "H" or "I" beam type cross section.
I can fill any size of needle I have in seconds, and winding up many needles is no effort at all.
Here pictured with a 12" Norwegian needle

The Netting Stand.

This netting stand is based on a design used by net makers on the island of Vinalhaven in Maine, U.S.A and is described in the book "Down East Netting" by Barbara M. Morton.

The stand is used for braiding (or knitting) small net items such as Lobster trap heads (entrances) and bait bags to go inside the traps.

The small box at the bottom of this stand has weights in it to stop the stand from being pulled over whilst pulling the knots tight, the top box is for holding spare needles and mesh sticks (Gauges).
The netter or group of netters would sit by the stand and work from a hook or in this case a steel rod at the top of the stand.

The Netting Stand in use.
Giving a Net Making work shop at the 25th Anniversary of the IGKT in Fareham 2007.

Take care,
Barry ;-)